- Study for segue
- Passing data between scenes
- Unwinding storyboard segues
Monday, November 25, 2013
iOS7 > Lesson #14 - Study for Segue
In this lesson, we will learn:

iOS7 > Lesson#13 - Tab Bar
In this lesson, we will learn:

We can find that the UITabComponent is located at the bottom of the screen.
For each content view, we should associated a view controller to handle user interaction and display updates.
In the context of a multiview application, this is known as the root controller and is responsible for controlling which content view is currently displayed to the user.
We can create a tab view application by 2 different templates: Tabbed Application and Empty Application.
Follow Lesson #1 - Hello World to create a new Xcode project named "TabView" with the template "Tabbed Application".

By default, 2 sets of View Controller files are created (.m & .f files) and you can also find 2 View Controller objects are linked with the Tab Bar View Contoller in main.storyboard.
Follow Lesson #1 - Hello World to create a new Xcode project named "TabBar" with the template "Empty Application".


- Introduction to Tab View
- Setting up the Tab Bar Example Application (with Empty and Tabbed template)
- UITabBar
Introduction to Tab View
From the following sample of Tab View searched from Internet:
We can find that the UITabComponent is located at the bottom of the screen.
For each content view, we should associated a view controller to handle user interaction and display updates.
In the context of a multiview application, this is known as the root controller and is responsible for controlling which content view is currently displayed to the user.
We can create a tab view application by 2 different templates: Tabbed Application and Empty Application.
Setting up the Tab Bar Example Application (with Tabbed)
Step#1: To create a new Xcode project with Tabbed ApplicationFollow Lesson #1 - Hello World to create a new Xcode project named "TabView" with the template "Tabbed Application".
 |
| Tabbed Application template |
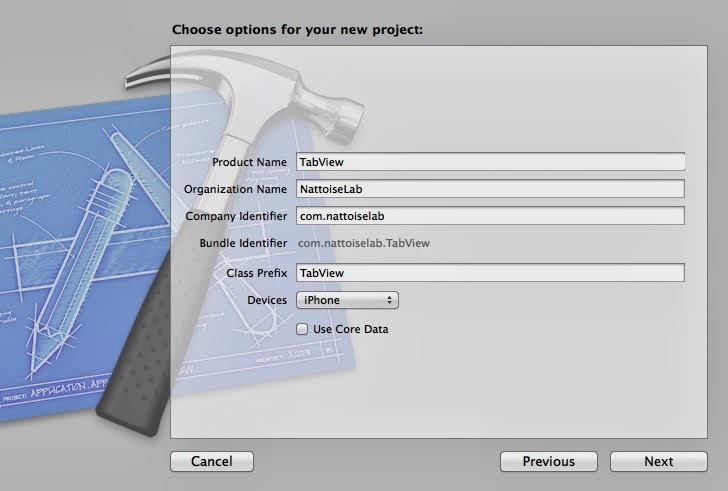 |
| project name as "TabView" |

By default, 2 sets of View Controller files are created (.m & .f files) and you can also find 2 View Controller objects are linked with the Tab Bar View Contoller in main.storyboard.
 |
| storyboard |
Step#2: Run and Compile
 |
| Tab 1 |
 |
| Tab 2 |
Setting up the Tab Bar Example Application (with Empty)
Step#1: To create a new Xcode project with Empty ApplicationFollow Lesson #1 - Hello World to create a new Xcode project named "TabBar" with the template "Empty Application".
 |
| Empty Application template |
 |
| project name as TabBar |

Step#2: To create a new Storyboard object
 |
| create a new Storyboard file |

 |
| name the storyboard as "main.storyboard" |
Step#3: To drag a Tab View Controller into Storyboard
Drag a Tab View Controller object into main.storyboard. By default, it includes 1 Tab Bar Controller and 2 View Controller objects with linkage. |
| Drag a Tab View Controller |
Step#4: Run & Compile
Why empty shown in the screen?
Step#5: Configure the main interface
Configure the main interface under deployment Info with "main".
Step#6: Edit the TabBarAppDelegate.m
Comment the following 2 statements inside the method didFinishLaunchWithOption: |
| TabBarAppDelegate.m |


Step#7: Run & Compile
 |
| Tab 1 |
 |
| Tab 2 |
Monday, November 18, 2013
[節錄] 專訪項明生:由家用「跳船」到手機遊戲內幕
香港網絡遊戲品牌 GameOne(智傲集團) 今天舉行記者會正式宣佈重金禮聘 Game 界猛人,人稱「宅男教父」、「橋王」的前 Sony
PlayStation 董事總經理項明生先生 James 擔任集團的行政總裁一職。集團董事施仁毅先生亦宣佈將會投放 $2,000 萬港幣在
GameApps.hk 手機遊戲平台,並且預言三年之內在香港上市,記者即場找來了 James 追訪一下他「過檔」的鴻圖大計和轉職感想。

轉戰「上游」更滿足
James 透露,他選擇加盟 GameOne 主要是因為想從遊戲界的「下游」轉戰「上游」工業作出新嘗試。以往 15 年自己一直負責一些前線市場銷售、包裝遊戲的工作,而現在則有機會參選遊戲開發及設計,對於自己來說更感興趣。以往在大公司很多創意及 idea 都會受到制肘,香港一直沒有門檻極高的電視遊戲開發資源及人力物力,不過在手機遊戲發展上卻可以一展拳腳,在新公司能有更大彈性和空間把理想和創意發揮, 相信可以獲得更大的滿足感,此外新的 CEO 工作彈性及靈活性更高,可以有更多時間繼續旅遊及撰寫專欄呢!

智傲集團董事長施仁毅先生和新任行政總裁項明生先生一起展示 GameOne 的遊戲作品。
電視遊戲市場大跌
由 Console 遊戲機市場轉到手機遊戲業,最主要是看準了流動市場的發展潛力,傳統遊戲機需要坐定定在家對著電視玩,不過而家人人隨身攜帶手機,可以係地鐵街上面隨時 玩,手機 game 稱得上是全民運動。提及傳統遊戲市場,James 直言日本電視遊戲機公會的報告顯示去年日本電視遊戲銷售額回到了 2007 年水平,市場銷售額下跌 1 兆日圓剩下 3 兆日圓,可以看到手機遊戲對傳統遊戲業帶來極大壓力。

項明生以一身 Cosplay 打扮以手機展示 GameApps.hk 平台。
手機遊戲回報高
他指出公司將會集中投放資源 在 Mobile 遊戲上,看好手機遊戲將會逐漸取代電視遊戲、甚至是電腦遊戲市場。Console Game 以往賣到 100 萬隻的遊戲已可被稱為「神作」,不過而家手機 Game(例如: Puzzle、轉珠遊戲) 容易上手,又沒有語言障礙,不論來自中英美法國家的人都可以玩,可見手機遊戲銷量遠超傳統遊戲市場,下載率數以千萬計,加上開發成本又遠比 Console Game 低得多,隨時一隻以一百萬開發既 Game 可以賺到過億元,回報率隨時可以數百萬倍奉還!

提供平台突圍
James 指出,GameApps.hk 推出「GameApps 百萬創業夢」主要是因為看中了年青人多橋,創意無限,只要欠缺了出頭的機會,所以希望可以為年青人提供一個平台可以發揮自己,把興趣變成職業,而且呢個 創意計劃更特別找來香港電視主席王維基先生作顧問,希望可以啟發及吸引本地創作。多年以來有能力開發電視遊戲就只有 3 家巨無霸公司,不過近年大家都見到「跑出」的都是一些不知名的公司,其中一個原因是手機遊戲入門門檻較低,給了細公司、年青人很多機會「突圍而出」,只要 大家有「創意」便有機贏取由 GameApps 提供的 100 萬元創業基金,獲得專業技術及市場支援。
Social Media 成功之道
當問及對年青人有甚麼建議,James 以全球大熱的《Angry bird》為例,這家芬蘭公司一直名不見經傳,之前曾經開發了 50 隻遊戲都「衰左」,不過要成功的確需要創意、勇氣、運氣、遊戲常識,而最大的訣竅就是一定要有 Social Media 社交媒介的推波助瀾協調,一定要在年青人集結的 facebook 洗版,否則便可以話 Out of sight 名正言順成為「死 Game」。
當被問及要在 3 年之內令公司上市會否有壓力呢,James 指出挑戰其實並不算大,以一個月推出一隻遊戲的速度計算,3 年共有超過 36 個機會,以市值 20 億的博雅互動為例,其實它只靠一隻「德州撲克」便成功跑出了,而 GameOne 機會多的是,只要好好把握機會相信便可以完成大計!
Source: unwire.hk
轉戰「上游」更滿足
James 透露,他選擇加盟 GameOne 主要是因為想從遊戲界的「下游」轉戰「上游」工業作出新嘗試。以往 15 年自己一直負責一些前線市場銷售、包裝遊戲的工作,而現在則有機會參選遊戲開發及設計,對於自己來說更感興趣。以往在大公司很多創意及 idea 都會受到制肘,香港一直沒有門檻極高的電視遊戲開發資源及人力物力,不過在手機遊戲發展上卻可以一展拳腳,在新公司能有更大彈性和空間把理想和創意發揮, 相信可以獲得更大的滿足感,此外新的 CEO 工作彈性及靈活性更高,可以有更多時間繼續旅遊及撰寫專欄呢!

智傲集團董事長施仁毅先生和新任行政總裁項明生先生一起展示 GameOne 的遊戲作品。
電視遊戲市場大跌
由 Console 遊戲機市場轉到手機遊戲業,最主要是看準了流動市場的發展潛力,傳統遊戲機需要坐定定在家對著電視玩,不過而家人人隨身攜帶手機,可以係地鐵街上面隨時 玩,手機 game 稱得上是全民運動。提及傳統遊戲市場,James 直言日本電視遊戲機公會的報告顯示去年日本電視遊戲銷售額回到了 2007 年水平,市場銷售額下跌 1 兆日圓剩下 3 兆日圓,可以看到手機遊戲對傳統遊戲業帶來極大壓力。
項明生以一身 Cosplay 打扮以手機展示 GameApps.hk 平台。
手機遊戲回報高
他指出公司將會集中投放資源 在 Mobile 遊戲上,看好手機遊戲將會逐漸取代電視遊戲、甚至是電腦遊戲市場。Console Game 以往賣到 100 萬隻的遊戲已可被稱為「神作」,不過而家手機 Game(例如: Puzzle、轉珠遊戲) 容易上手,又沒有語言障礙,不論來自中英美法國家的人都可以玩,可見手機遊戲銷量遠超傳統遊戲市場,下載率數以千萬計,加上開發成本又遠比 Console Game 低得多,隨時一隻以一百萬開發既 Game 可以賺到過億元,回報率隨時可以數百萬倍奉還!
提供平台突圍
James 指出,GameApps.hk 推出「GameApps 百萬創業夢」主要是因為看中了年青人多橋,創意無限,只要欠缺了出頭的機會,所以希望可以為年青人提供一個平台可以發揮自己,把興趣變成職業,而且呢個 創意計劃更特別找來香港電視主席王維基先生作顧問,希望可以啟發及吸引本地創作。多年以來有能力開發電視遊戲就只有 3 家巨無霸公司,不過近年大家都見到「跑出」的都是一些不知名的公司,其中一個原因是手機遊戲入門門檻較低,給了細公司、年青人很多機會「突圍而出」,只要 大家有「創意」便有機贏取由 GameApps 提供的 100 萬元創業基金,獲得專業技術及市場支援。
Social Media 成功之道
當問及對年青人有甚麼建議,James 以全球大熱的《Angry bird》為例,這家芬蘭公司一直名不見經傳,之前曾經開發了 50 隻遊戲都「衰左」,不過要成功的確需要創意、勇氣、運氣、遊戲常識,而最大的訣竅就是一定要有 Social Media 社交媒介的推波助瀾協調,一定要在年青人集結的 facebook 洗版,否則便可以話 Out of sight 名正言順成為「死 Game」。
當被問及要在 3 年之內令公司上市會否有壓力呢,James 指出挑戰其實並不算大,以一個月推出一隻遊戲的速度計算,3 年共有超過 36 個機會,以市值 20 億的博雅互動為例,其實它只靠一隻「德州撲克」便成功跑出了,而 GameOne 機會多的是,只要好好把握機會相信便可以完成大計!
Source: unwire.hk
Sunday, November 17, 2013
[XCode] How To Prototype In Xcode Using Storyboard
Background
The purpose of prototyping in Xcode is to be able to create a super high fidelity flow using the exact same software that builds iOS Apps. In Xcode, there is no limit. You can embed beautiful interactions, transitions, animations and sounds to produce a true native experience.

The end goal is to eventually be able to implement your own designs for iOS. Just like learning CSS for the Web, this will immensely (~very much, extremely) help developers overcome their struggle with UI work and push the collaborative (合力) work between designers and developers. Design is how it works, Steve Jobs said. Designing static images is not enough, you need to bring them to life.
Start A New Project
- 1) Open Xcode, then “Create a new Xcode Project”.
- 2) Select “Single View Application”.
- 3) Set up project name as "Prototype" and company name.

Setup Up App
- 1) Only enable "Portrait" orientation.
- 2) Drag and drop your app icons (if have).
- 3) Drag and drop your launch images. It’s the image that shows up when your app first loads. (if have)
- 4) Set the style of Status Bar as "Black Opaque".

Add Images
Have your App screens ready without the status bar. To add them, create a “Group”, then “Add Files To…”. You can also drag and drop images to that folder.

Make sure you have “Copy items into destination group’s folder” and “Add to targets” enabled.


First Screen
Now that we have the basic setup done and the images added, we can finally start Storyboarding. Go to Storyboard and drag and drop a Button from the Object library.


Why a button? Because it allows you to link to a second screen. It acts as a clickable image. Resize the button to fit the entire dimension of the screen.
When you select the button, you should see properties appearing in the Attributes inspector. The properties we’re interested in are Type, Title and Image. Set Type to Custom, Title to nothing and Image to your first screen (type the name of your image and it will autocomplete).

Second Screen
Screens are called “Controllers” in Xcode. To create a second screen, simply drag and drop a View Controller, then repeat the previous step.

Connecting Screens
Xcode connects screens by a link they call “segue”. To create a segue, hold the “Control” key on your keyboard with your mouse pointer on the first screen and drag and drop on the second screen. Select “modal”. This will create a transition that slides the second screen from the bottom.

You can customize the transition by clicking on the segue (circle symbol between the two screens) and set the Transition to "Cover Vertical", "Flip Horizontal", "Cross Dissolve" or "Partial Curl". Or, you can uncheck “Animate” if you don’t want any animation.

The Push Segue
The Push segue doesn’t work without a Navigation Controller. To create one, select the first screen’s View Controller and go to Editor > Embed In > Navigation Controller. A header bar will appear on every screen connected.

To remove that bar, select the Navigation Controller, then set the Top Bar property to None.

Now, you can use the Push segue and it will do a horizontal sliding transition.
Testing Your App
Xcode comes with an iOS Simulator that allows you to preview your App. To do that, select iPhone 6.1 Simulator and click on the Run button in the far top left. An iPhone will appear and you will be able to interact with the App you’ve just built.

Clicking on the first screen will lead to the second screen. It’s not much, but it’s a major step in understanding how Storyboard works.
- Download Prototype 1.0. It’s what we have so far.
Header And Content
This is where it gets a lot more interactive. Inside a View Controller, you can have all kinds of Objects from the Object Library. A typical screen has a sticky header, multiple buttons and a scrollable content.
First, you must separate your header and content assets in Photoshop or Sketch. Let’s remove the button we created earlier and drag in an Image Object for the header. In Attributes, set the image name. For the dimensions, go to the Size tab and set the height according to your header image.

Note that Xcode uses pt and not px units (1pt = 2px). Make sure that you use pair numbers in your assets.
On top of the header, you can drag in Button and Label objects.
Scrollable Content
To create a scrollable content, drag in a Table View and set the dimension to fill the rest of the screen. Inside that Table view, drag in a button and set the size according to your image’s dimension. From that button, you can create a segue to the second screen. Make sure that you have the button selected when you do the hold Ctrl + drag and drop trick.

You will need to make sure that the Table View layer has less priority than the header. Xcode works in reverse order where the layers below take priority.
The Back Button
I’m including this function because it’s really useful. I will explain it more in a future tutorial, but for now, create a Group and drag and drop these Objective-C category files. Make sure to check “Add to Targets” during import.
Once imported, you should be able to link your back button to the Exit green icon and an option called backButton will appear. Click on it.

Views and Objects
Here’s a schema of how Views and Objects can be structured:

Once you understand how Views and Objects work, you will be able to customize your Controllers the way you want.
Previewing On Your Phone
Xcode allows you to preview your App on your iPhone. Unfortunately, it’s a complicated process and requires an iOS developer account. Once you have an account, you must follow their instructions on how to create a Certificate and a Provisioning Profile on your Mac so that your device has permission to install the App.
Download The Template
This template should help you get started:

Simply replace the images with your own, tweak the Inspector settings, add new View Controllers and connect them using segues.
Resources
Just like in Sketch, experimenting with other people’s Xcode projects is crucial part to learning. Here are some resources you may find useful:
- Cocoa Controls – You’ll find great open source controls to play with.
- Search on Github for Xcode projects.
- More to come…
Final Thought
As a designer, I would never have thought that I’d be writing a tutorial about Xcode. It’s traditionally an application that appeals to developers as the barrier to entry is huge because of its complex UI and Objective-C knowledge requirement. But since Xcode 4, the addition of Storyboard allows designers to overcome their fear of writing codes and directly use an intuitive interface to produce meaningful interactions.
This tutorial wouldn’t have been possible without the help of Max Tagher, our iOS developer at Heyzap who helped me through countless road blocks. If you have someone knowledgeable about iOS development, I suggest that you start getting friendly with that person and ask for help whenever you run into a problem.
This is the first tutorial of a series. In the next tutorial, I will include custom fonts, more complex flows, animations and sounds. Finding good Xcode resources is a massive endeavor, so if you have any, please do share.
167 Responses to “How To Prototype In Xcode Using Storyboard”
 Paul Mederos says:
I never considered using Xcode for prototyping until you mentioned it a few days back. Tried it out (pretty much exactly how you describe it) and found it extremely useful… and fast! Excited to see where other prototypers take this tool…
Friday, November 15, 2013
[節錄] 覺得皮夾過厚?你該來看看這個信用卡多合一卡片「Coin」!

塞滿皮包的信用卡老是讓你覺得很煩嗎?行動支付、Square、NFC 等等方式也讓你覺得太過先進而難以想像嗎?那你需要的是這個 Coin,把金融卡與信用卡都結合成一張卡片的方式。 Coin 是 Y Combinator 的育成公司,旨在移除將行動支付解決方案裡的「行動」給去掉。他們的作法是做出一個跟信用卡一樣大小的裝置,但特別的是,這個叫做 Coin 的裝置可以取代所有信用卡、禮物卡、金融卡、會員卡。

他是這樣辦到的,Coin 實際上是一台微型電腦,可以儲存所有你的信用卡資訊,上頭有像一般信用卡的磁條裝置,但上頭的磁條資訊可以隨需求變更資訊,使用者可以依照需求來切換信用 卡,然後交給店員刷卡。儲存新的信用卡資訊也相當簡單,Coin 會隨機附上一個類似 Square 讀卡機的裝置,接上你的智慧型裝置、刷你的卡片、照張卡片照片進 Coin 的 App,然後就完成了。

當然,各位最喜愛的問題又來了,掉了這張卡怎麼辦?那跟掉皮包不是一樣嗎;另外,國外有記者問 Coin 是否把信用卡資訊存在 App 或除了 Coin 卡片外的其他地方,Coin 的發言人表示,卡片資訊會存在Coin的伺服器,並利用 128/256 bit 的加密傳輸,不管是藍牙、http 或者是伺服器上。其他問題比如說,會不會店員接過卡片後誤觸切換卡片,Coin 的人表示,他需要一點小力氣直接按在鈕上才會啟動,所以是比較難會發生。
Coin 不需要充電,一般裡頭的電池可以持續兩年以上,之後會是用換電池的方式解決,而 Coin CEO 則是表示,2年後可以換成新的 Coin 卡片,不過現在還不清楚價格,下面是 Coin 的影片,看了你會想買嗎?
不過 Coin 現在還沒上市,現在他們正準備群眾募資,準備募集 5萬美金,希望在明天夏天上市,在群眾募資期間,只要 50美金,正式上市則要 100美金。您可以先去逛逛他們的網站幫助募資吧!

Subscribe to:
Posts (Atom)