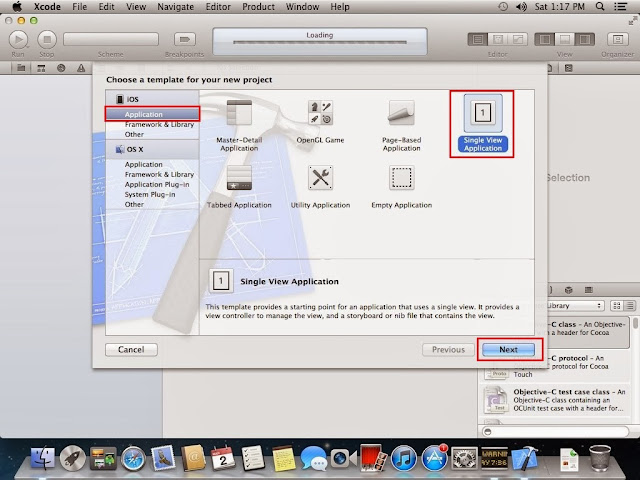
Step #2 - Choose a template for your new project

- The pane on the left side of the sheet is divided into two main sections: iOS and Mac OS X.
- Each of the icons shown in the upper-right pane represents a separate project template that can be used as a starting point for your iOS applications.
- The icon labelled Single View Application is the simplest template.
Step #3 - Setup the Project options
 |
| project option under Xcode 4.6 |
Product Name: HelloWorld
Organization Name: Nattoise Lab
Company Identifier: com.nattoiselab
Class Prefix:
- should populate this with a sequence of at least three capital letters. These characters will be added to the beginning of the name of all classes that Xcode creates for us. This is done to avoid naming conflicts with Apple (who reserves the use of all two-letter prefixes) and other developers whose code we might use.
- In Objective-C, having more than one class with the same name will prevent your application from being built.
- Here BID stands for Beginning iPhone Development. While there are likely to be many classes named, for example, ViewController, far fewer classes are likely to be named BIDMyViewController, which means a lot less chance of conflicts.
Checkboxes:
- [Check] Use Storyboards - will discuss later.
- [Check] Use Automatic Reference Counting (ARC) - is a recent addition to the Objective-C language, introduced with iOS 5, that makes your life much easier. It will discuss later.
- [Uncheck] Include Unit Tests - will set up your project in such a way that you can add special pieces of code to your project, called unit tests, which are not part of your application but run every time you create your application to test certain functionality. Unit tests allow you to identify when a change made to your code breaks something that was previously working. Although it can be a valuable tool, we won't be using automated unit testing now.
Xcode will combine the Product Name and Company Identifier (i.e. com.nattoiselab.HelloWorld) to generate a unique Bundle Identifier for your project.
 |
| project option under Xcode 5.0 |
Step #4 - Project save location
In the final dialog box, uncheck the box for Create local git repository for this project.
Notes:* A source control repository is a tool used to keep track of changes made to an application's source code and resources while it's being built. It also facilitates multiple developers working on the same application at the same time by providing tools to resolve conflicts when they arise. We won't be using source control in this book, so it's up to you to enable it or disable it, whichever works for you.
Step #5 - The Xcode Workspace Window
 |
| Summary Page of Xcode Workspace under Xcode 4.6 |
 |
| Summary Page of Xcode Workspace under Xcode 5.0 |
Step #5a - Toolbar
Run & Stop button for running your project
A pop-up Scheme menu & Breakpoints - a Scheme brings together target and build settings, and the toolbar pop-up menu lets you select a specific setup with just one click.
Activity View - a big box in the middle of the toolbar - displays any actions or processes that are currently happening. For example, when you run your project, the activity view gives you a running commentary on the various steps it's taking to build your application. If you encounter any errors or warnings, that information is displayed here as well. If you click the warning or error, you'll go directly to the issuers navigator, which provides more information about the warning or error, as described in the next section.
Step #5b - The Navigator View
 |
| Simulator under Xcode 4.6 |
 |
| Simulator under Xcode 5.0 (with iPhone Retina, 4-inch) |
You can select different iOS simulator as below:
This lesson is the end. See you next time~!


No comments:
Post a Comment